Swift Package Collections
Recently I decided to publish a whole suite of reliable high quality SwiftUI views and back-ports that I’ve been working on since iOS 13. I wanted to use the new Swift Package Collections to simplify discovery and distribution and thought I’d document that process so that others could benefit from it as well.
What are Collections?
First lets briefly cover what a Package Collection is and why you may want to create one.
A collection is basically an aggregated list of Swift Packages combined into a JSON file that can be added to Xcode 13+, allowing users to more easily discover those packages.
The reasons you may want to create a collection could be (but are not limited to):
- Single reference to your favourite packages
- Improved discovery of a suite of packages
- Proof of ownership (signing proves who created the collection)
- Engenders trust (the user is aware if the collection has been modified after it was signed)
To learn more, checkout Apple’s official documentation
Prepare packages
The first thing you need are the URLs to a few packages you want to add to your collection. As of 2021 these packages must be hosted by GitHub since other sources are not currently supported.
Once we have our package URLs, we need to complete the following steps:
- Create a JSON file that will contain our list of URLs and some other metadata
- Generate an unsigned Package Collection, this will be a another JSON file
Input.json
The first file we need to create we will call input.json but you can name it whatever you like. Just make sure to update any commands below with the name you choose.
The format of the JSON is fairy self-explanatory but lets take a look at an example:
{
    "name": "Shaps Favourite Packages",
    "overview": "My favourite Swift packages",
    "keywords": ["swift", "swiftui"],
    "packages": [
        { // ::info:: Package 1
            "url": "https://github.com/SwiftUI-Plus/Containers.git",
        },

        { // ::info:: Package 2
            "url": "https://github.com/SwiftUI-Plus/Presentation.git",
        },
    ],
    "author": {
        "name": "Shaps Benkau"
    }
}
Looking at the above we can see what the name of the package is, the author and the list of packages this collection will include.
Unsigned Collection
Next up we need to use a tool provided by Apple that generates the real collection.json which will automatically populate the additional metadata from the GitHub repositories data.
Note if the repository metadata ever changes, you’ll need to regenerate your
collection.json.
In order to generate a collection.json we need to perform a few steps:
- Generate a new GitHub Personal Access Token
- Clone the swift-package-collection-generator tools repo
- Copy
input.jsonto the tools root directory - Run the generator to make your
collection.json
Once you’ve completed steps 1 and 2, open your Terminal and switch to the tools root directory.
The cloned directory should now contain the tools as well as input.json and you should have a copy of your personal access token handy.
Now we’re ready to run the following command (assuming you cloned to Downloads):
cd ~/Downloads/swift-package-collection-generator-main
swift run package-collection-generate \
    input.json unsigned-collection.json \
    --auth-token github:github.com:PERSONAL_ACCESS_TOKEN
You should now have unsigned-collection.json in the same directory.
At this point you have your Swift Package Collection and if you don’t want to sign your collection you can skip any further reading. Simply host this json file somewhere on the Internet for you and your users to enjoy 🎉
If you choose not to sign your collection, Xcode will indicate as such and prompt the user, asking whether they want to trust it anyway. So, although this is possible its recommended that you
signyour collections.
Signed Collection
In order to sign your collection you will need complete a few additional steps:
This may seem intense but its just broken down into very small steps to ensure the process is as clear as possible.
- Create a certificate request
- Upload the request to the Apple Developer site and download the signed certificate
- Install the certificate to the keychain
- Copy the downloaded certificate to the tools root directory
- Export the certificate’s private key from the keychain into the tools root directory
- Convert the key into the PEM format
- Generate the signed collection using the certificate and key
So, if you’re ready to sign your collection, lets get started 👍
Create a certificate request
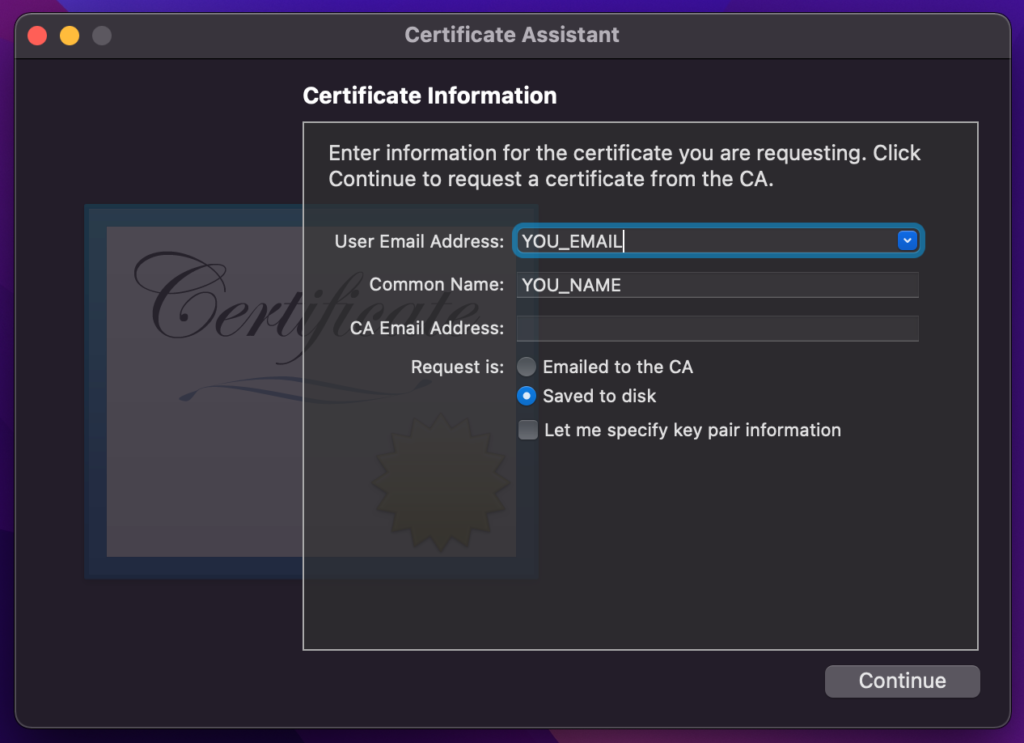
Open the Keychain app and select from the menu:

Enter your details and select Save to Disk. For the purposes of this article I’m going to assume you save the request to your Downloads folder.

Upload certificate request
Visit the Certificates, Identities and Profile section of the Apple Developer site.
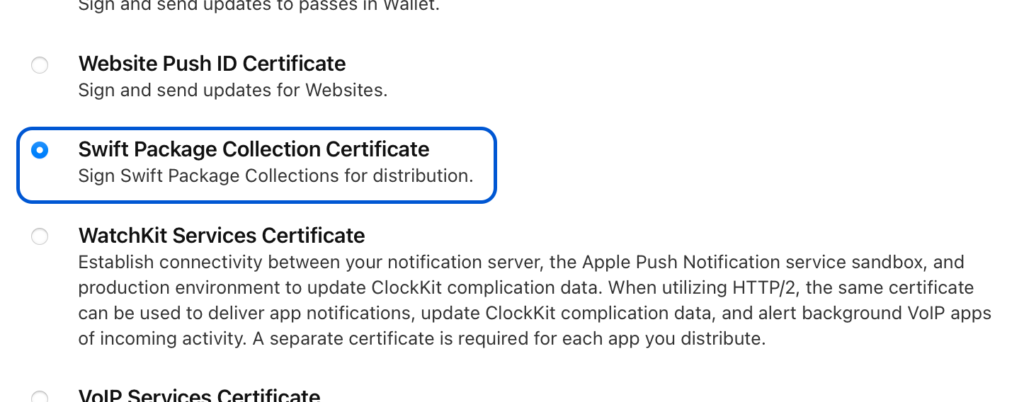
Add a new certificate and when asked, scroll down and select Swift Package Collection Certificate under the Services section. Then choose the certificate request you generated in the previous step.

Now Download the certificate to your Downloads folder and double-click it to automatically install it into your Keychain.
Prepare certificate and key
Next we need to move the downloaded Certificate into the tools directory.
cp swift_package.cer swift-package-collection-generator/At this stage we now have unsigned-collection.json and swift_package.cer in our tools directory but we still need the private key.
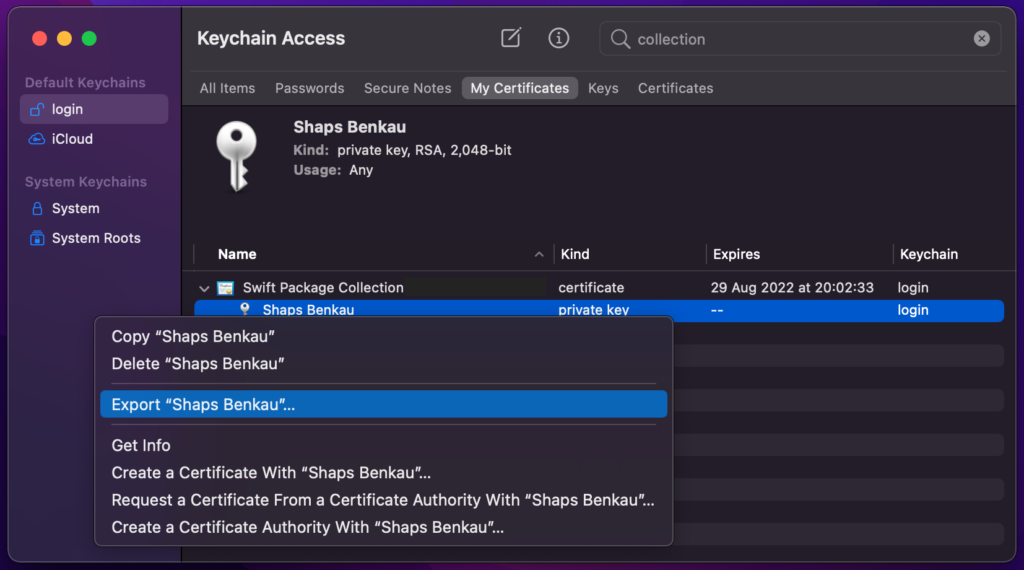
Open the Keychain and find your Swift Package Collection certificate. Right click on the private key row only (do not select the certificate) and select Export.

Name the file key.p12 and when prompted enter a password (this is important). Save the file to the tools root directory.
~/Downloads/swift-package-collection-generator/key.p12We’re almost ready, we just need to convert the key into the required PEM format. The tools folder should now contain the following files (as well as the tools itself):
unsigned-collection.jsonswift_package.cerkey.p12
Convert the key to PEM
Before we can sign our collection we need to perform one last step that will convert the key into the necessary format.
Note the following commands assume you have used the filenames I’ve suggested throughout this article. If you haven’t, just adjust those as required.
First we need to convert the file into the PEM format:
openssl pkcs12 -nocerts \
    -in key.p12 \
    -out enc.pem
Now we need to convert the PEM into an RSA format:
openssl rsa \
    -in enc.pem \
    -out key.pem
When prompted you will need to enter the password you assigned in the previous step.
Sign the collection
And finally we’re ready to sign our collection:
swift run package-collection-sign \
    unsigned-collection.json \
    signed-collection.json
    key.pem swift_package.cer
Summary
We should now have a fully signed Swift Package Collection ready to be uploaded to the Internet and ready for use.
If you have any issues or feedback I’d love to hear from you either in the comments or on Twitter @shaps